AI Integration (MCP)
VMark includes a built-in MCP (Model Context Protocol) server that allows AI assistants like Claude to interact directly with your editor.
What is MCP?
The Model Context Protocol is an open standard that enables AI assistants to interact with external tools and applications. VMark's MCP server exposes its editor capabilities as tools that AI assistants can use to:
- Read and write document content
- Apply formatting and create structures
- Navigate and manage documents
- Insert special content (math, diagrams, wiki links)
Quick Setup
VMark makes it easy to connect AI assistants with one-click installation.
1. Enable MCP Server
Open Settings → Integrations and enable the MCP Server:
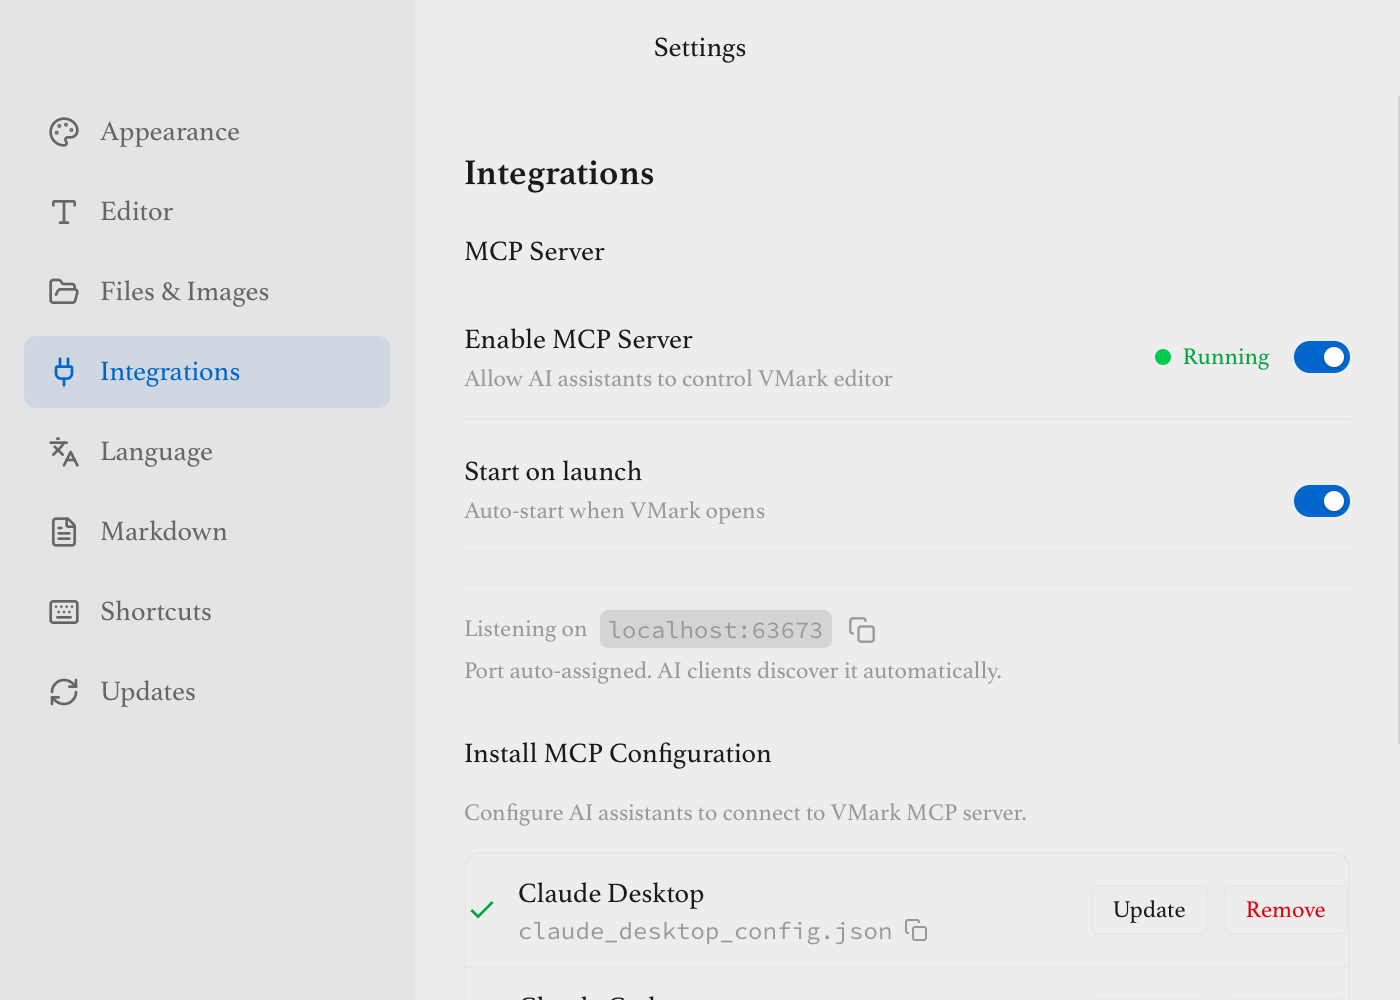
- Enable MCP Server - Turn on to allow AI connections
- Start on launch - Auto-start when VMark opens
- Auto-approve edits - Apply AI changes without preview (see below)
2. Install Configuration
Click Install for your AI assistant:
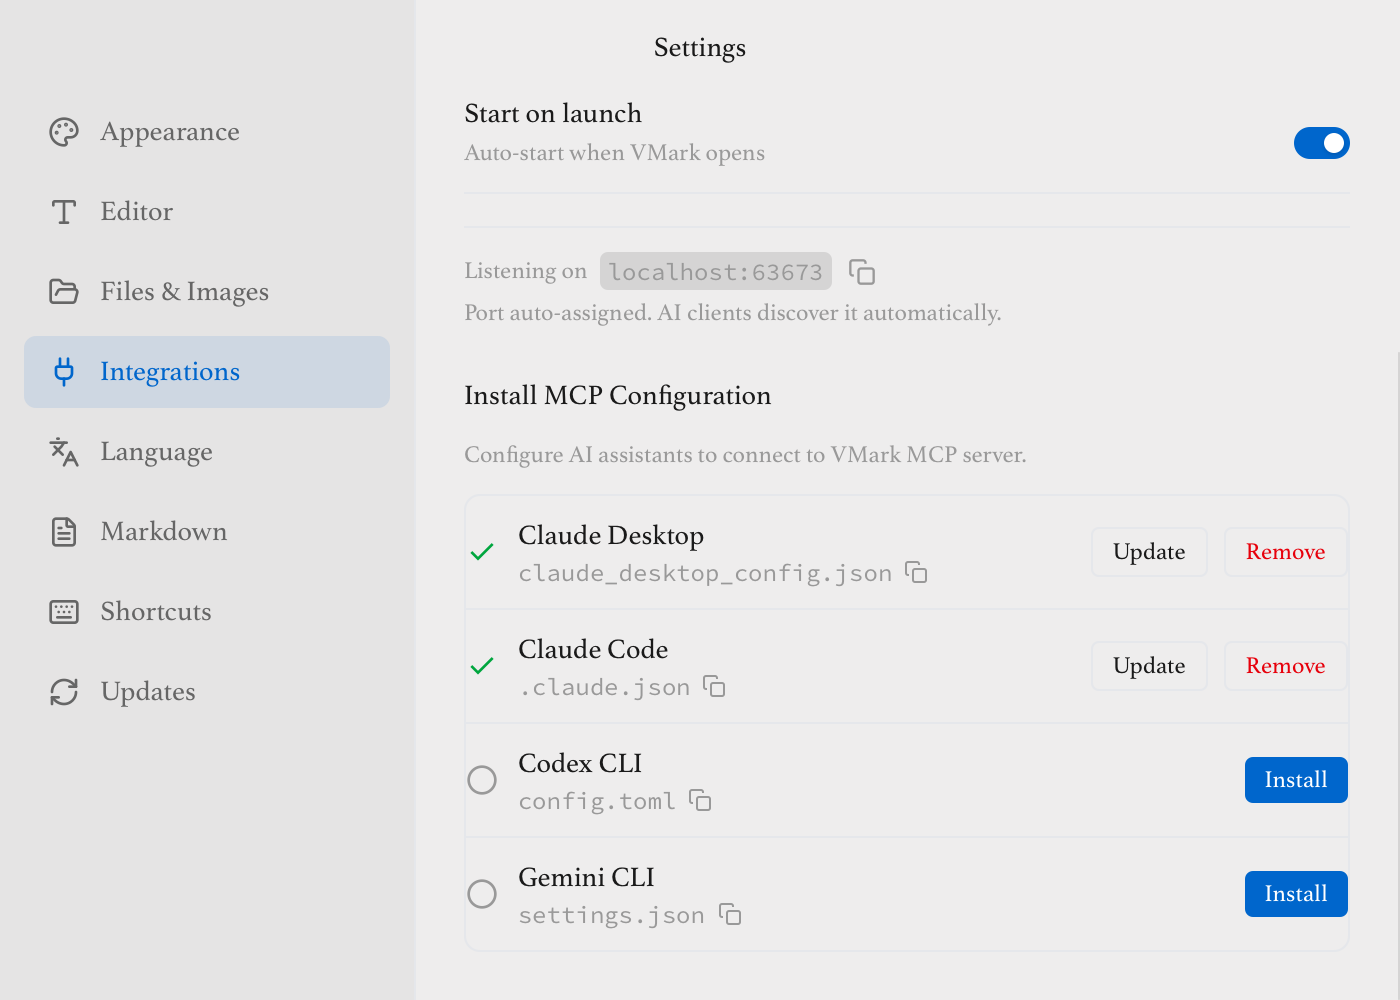
Supported AI assistants:
- Claude Desktop - Anthropic's desktop app
- Claude Code - CLI for developers
- Codex CLI - OpenAI's coding assistant
- Gemini CLI - Google's AI assistant
Other MCP-Compatible Clients
Other MCP-compatible clients such as Cursor, Windsurf, and similar tools can also connect to VMark's MCP server. Configure them manually by pointing to the MCP server binary path (see Manual Configuration below).
Status Icons
Each provider shows a status indicator:
| Icon | Status | Meaning |
|---|---|---|
| ✓ Green | Valid | Configuration is correct and working |
| ⚠ Amber | Path Mismatch | VMark was moved — click Repair |
| ✗ Red | Binary Missing | MCP binary not found — reinstall VMark |
| ○ Gray | Not Configured | Not installed — click Install |
VMark Moved?
If you move VMark.app to a different location, the status will show amber "Path Mismatch". Simply click the Repair button to update the configuration with the new path.
3. Restart Your AI Assistant
After installing or repairing, restart your AI assistant completely (quit and reopen) to load the new configuration. VMark will show a reminder after each configuration change.
4. Try It Out
In your AI assistant, try commands like:
- "What's in my VMark document?"
- "Write a summary of quantum computing to VMark"
- "Add a table of contents to my document"
See It in Action
Ask Claude a question and have it write the answer directly to your VMark document:
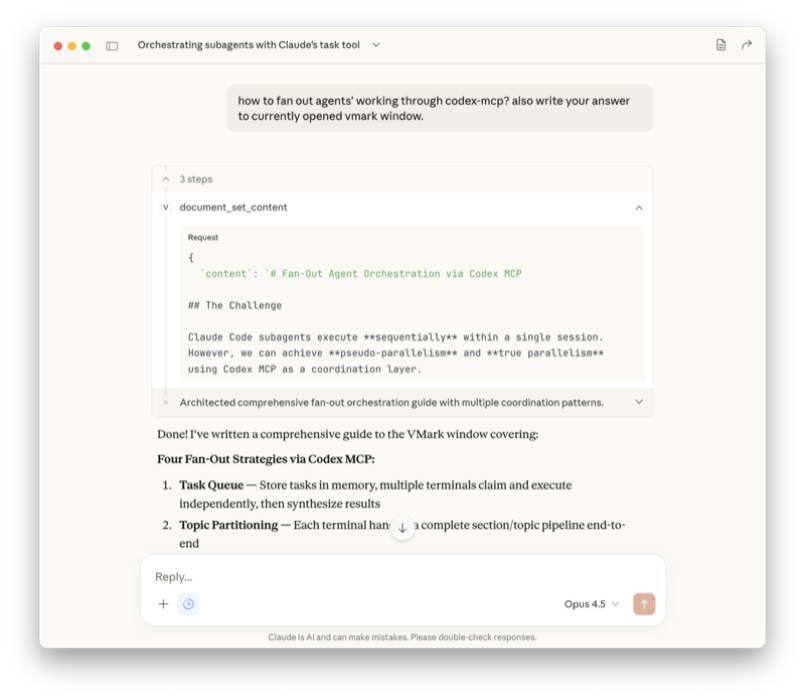
Claude Desktop calls document → set_content to write to VMark
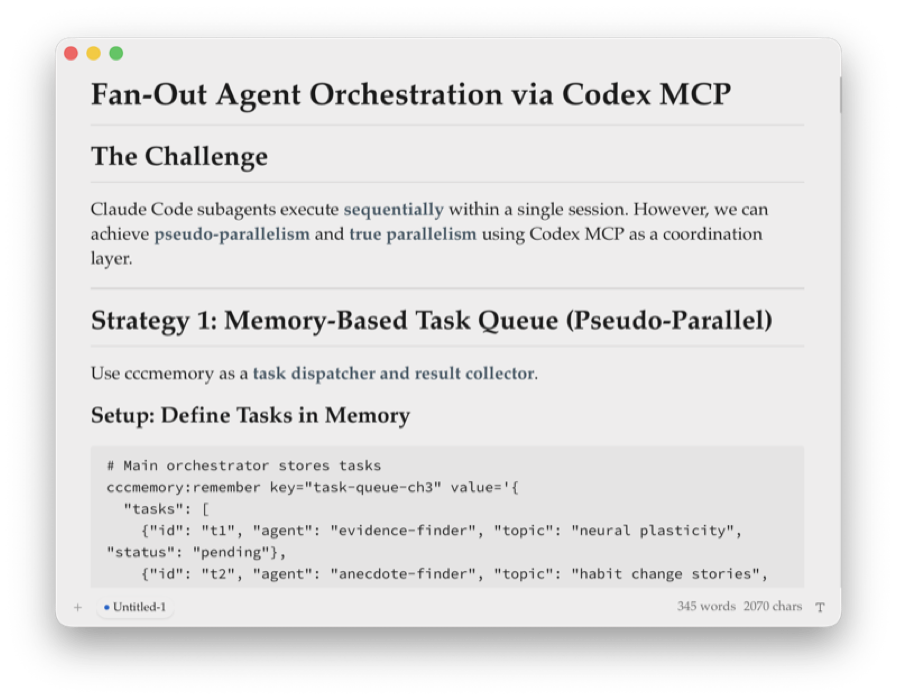
The content appears instantly in VMark, fully formatted
Manual Configuration
If you prefer to configure manually, here are the config file locations:
Claude Desktop
Edit ~/Library/Application Support/Claude/claude_desktop_config.json (macOS) or %APPDATA%\Claude\claude_desktop_config.json (Windows):
{
  "mcpServers": {
    "vmark": {
      "command": "/Applications/VMark.app/Contents/MacOS/vmark-mcp-server"
    }
  }
}
Claude Code
Edit ~/.claude.json or project .mcp.json:
{
  "mcpServers": {
    "vmark": {
      "command": "/Applications/VMark.app/Contents/MacOS/vmark-mcp-server"
    }
  }
}
Codex CLI
Edit ~/.codex/config.toml:
[mcp_servers.vmark]
command = "/Applications/VMark.app/Contents/MacOS/vmark-mcp-server"
Gemini CLI
Edit ~/.gemini/settings.json:
{
  "mcpServers": {
    "vmark": {
      "command": "/Applications/VMark.app/Contents/MacOS/vmark-mcp-server"
    }
  }
}
Finding the Binary Path
On macOS, the MCP server binary is inside VMark.app:
VMark.app/Contents/MacOS/vmark-mcp-server
On Windows:
C:\Program Files\VMark\vmark-mcp-server.exe
On Linux:
/usr/bin/vmark-mcp-server(or where you installed it)
The port is auto-discovered — no args needed.
CLI flags (advanced)
The MCP server binary supports a small set of flags for diagnostics and legacy setups:
| Flag | What it does |
|---|---|
--version (or -v) | Print the version (must match the running VMark) and exit. |
--health-check | Run a self-test against the running VMark bridge and exit. Use this to verify your install before wiring an AI assistant. |
--port <number> | Manual port override. Skip the auto-discovery handshake and connect on the given port. Only useful for legacy setups where the bridge port is fixed externally; the auto-discovery path is preferred. |
Example:
vmark-mcp-server --health-check
vmark-mcp-server --version
vmark-mcp-server --port 9223   # legacy / manual
How It Works
AI Assistant <--stdio--> MCP Server <--WebSocket--> VMark Editor- VMark starts a WebSocket bridge on an available port when launched
- The MCP server reads the port and auth token from VMark's app data directory
- The MCP server connects and authenticates via the WebSocket bridge
- AI assistant communicates with the MCP server via stdio
- Commands are relayed to VMark's editor through the bridge
Available Capabilities
When connected, your AI assistant can:
| Category | Capabilities |
|---|---|
| Document | Read/write content, search, replace |
| Selection | Get/set selection, replace selected text |
| Formatting | Bold, italic, code, links, and more |
| Blocks | Headings, paragraphs, code blocks, quotes |
| Lists | Bullet, ordered, and task lists |
| Tables | Insert, modify rows/columns |
| Special | Math equations, Mermaid diagrams, wiki links |
| Workspace | Open/save documents, manage windows |
See the MCP Tools Reference for complete documentation.
Checking MCP Status
VMark provides multiple ways to check the MCP server status:
Status Bar Indicator
The status bar shows an MCP indicator on the right side:
| Color | Status |
|---|---|
| Green | Connected and running |
| Gray | Disconnected or stopped |
| Pulsing (animated) | Starting up |
Startup typically completes within 1-2 seconds.
Click the indicator to open the detailed status dialog.
Status Dialog
Access via Help → MCP Server Status or click the status bar indicator.
The dialog shows:
- Connection health (Healthy / Error / Stopped)
- Bridge running state and port
- Server version
- Available tools (12) and resources (4)
- Last health check time
- Full list of available tools with copy button
Settings Panel
In Settings → Integrations, when the server is running you'll see:
- Version number
- Tool and resource counts
- Test Connection button — runs a health check
- View Details button — opens the status dialog
Troubleshooting
"Connection refused" or "No active editor"
- Ensure VMark is running and has a document open
- Check that the MCP Server is enabled in Settings → Integrations
- Verify the MCP bridge shows "Running" status
- Restart VMark if the connection was interrupted
Path mismatch after moving VMark
If you moved VMark.app to a different location (e.g., from Downloads to Applications), the configuration will point to the old path:
- Open Settings → Integrations
- Look for the amber ⚠ warning icon next to affected providers
- Click Repair to update the path
- Restart your AI assistant
Tools not appearing in AI assistant
- Restart your AI assistant after installing the configuration
- Verify the configuration was installed (check for green checkmark in Settings)
- Check your AI assistant's logs for MCP connection errors
Commands fail with "No active editor"
- Make sure a document tab is active in VMark
- Click in the editor area to focus it
- Some commands require text to be selected first
How Edits Work
The pruned MCP surface follows the read-write spine: AI assistants call document.read to get the current content + a revision token, reason about it, then call document.write with the new full content. The revision token guards against silent overwrites: if you typed in VMark while the AI was thinking, the write returns STALE and the AI re-reads.
For GitHub Actions workflow YAML files, the AI uses workflow.apply_patch instead — VMark's CST-aware mutators preserve comments, anchors, and key order that a raw text rewrite would lose.
There is no preview/approval step in the new surface. If you want to review every change, run an external git workflow (work on a branch, review the diff, commit when satisfied) — this gives you the same control with industry-standard tools.
Security Notes
- The MCP server only accepts local connections (localhost)
- No data is sent to external servers
- All processing happens on your machine
- The WebSocket bridge is only accessible locally
Next Steps
- Explore all MCP Tools available
- Learn about keyboard shortcuts
- Check out other features